Assignment 4b: Frontend UI Coding
Overview
The big picture. In this assignment, you will build a front end for your app to complement the back end that you built in the previous assignment, so that you’ll have a working full-stack web app. Whereas you used the Context tool to generate code for your backend, in this assignment you’ll use an agentic tool (such as Cursor) to “vibe code” your front end.
Due dates. This a two-week assignment. The due date for delivering a working web app, with your new front end and an updated back end, is October 28. To ensure that you are making good progress, you are required to submit a checkin half way through. You should aim to have a basic version of your app working by that date. This intermediate checkin will not be fully graded, but you will be given a grade of check/check-plus/check-minus (which will be incorporated into the assignment grade) to reflect whether you completed sufficient work prior to the checkin. You may not use slack days to postpone this checkin, but you can use them for the final deliverable.
What you’ll learn. There are three learning goals for this assignment (1) learning how to implement a front end with reactive components; you’ll use Vue.js (v3) as the framework for this; (2) to give you experience with an agentic development tool such as Cursor or Windsurf; and (3) to help you develop skills in the visual and interaction design of user interfaces.
The Philosophy Behind This Assignment
Please read this. Before explaining the very particular way in which we expect you to work on this assignment, we’d like to explain our rationale: what we’re trying to accomplish and why we believe this is a good approach. We hope you will read this carefully so that the requirements of the assignment will make sense to you. Make sure to read the advice section before you start too, and to ask questions if anything is unclear. As always, we welcome your ideas and feedback, in the post-assignment survey and on Piazza or by email to the lecturers.
Agentic coding. LLMs are being used in software development in a variety of different ways. Some developers use chatbots (such as ChatGPT) to help them design software, generate fragments of code and answer questions, but the lack of integration between chatbots and IDEs makes this inconvenient. Increasingly, developers are using IDEs such as Cursor and Windsurf that integrate LLMs as agents that can write and explain code, diagnose problems, and so on. These tools offer important advantages because they bring the full power of LLMs to bear on a codebase while expecting very little from the user. They are particularly helpful in coding situations that involve more configuration and stylized directory structures (which are common features of front-end frameworks like Vue!). By using one of these tools in this assignment, we hope that that you will get a sense of how it feels to work in this way, and will develop a better understanding of its advantages and disadvantages.
Risks of agentic coding. The main risk of using these tools is that you will allow them to create code that outpaces your ability to understand it, and that you will end up with a codebase that does not meet your design intentions and that you are unable to modify easily. To mitigate this risk, we recommend very strongly that you take baby steps, asking the tool to generate your front end component-by-component, giving clear guidance at each stage to maximize conformance to your design, and testing as you go. You should also make use of the ability to point the agent to relevant context; in Cursor, for example, this is done by referring to file names with an @-sign before them in your prompt (similarly to the way in which you marked links for the Context tool).
The financial cost of agentic coding. One downside of agentic coding is that it can get very expensive. You do not have much control over the context, so the tool will tend to ingest a large part of your codebase when the LLM is called. This means that if you have only a student subscription, you may exceed your budget after a while and find that you have been relegated to using a less powerful LLM.
Separating back-end and front-end development. In industrial software development, the front end and back end of an app are usually developed in different repos and deployed on different servers. It’s standard practice to have separate teams for the back end and front end because developing them involves different skills. At runtime, the demands on the servers are very different: a front end server tends to be lightly loaded, since it’s only task is to provide the code (HTML, CSS and JavaScript) that runs in the browser, whereas the back end must handle all the requests for reading and writing from the database. The front end server is also simpler because it serves only static resources, and can thus use a simpler platform.
In the setting of this class, this separation will be helpful too. You’ll be able to build your front end in a fresh repo without worrying that changes made by the agentic tool will damage your back end. To enable the tool to generate front end code that uses the back end service appropriately, you will need to give it an API specification of your back end. You will be able to generate this easily within the backend using a prompt we will provide. As you evolve your front end, you will undoubtedly find that you want to make changes to your back end (for example because a concept does not provided a query that the front end requires). To handle this, you will continue to work on your back end as before, using the Context tool to update your concepts, replaying prompts that you built previously.
Iterative development. You will build a working web app by iterating on the following steps:
- Polishing one or more concepts in your back end to ensure that they the behavior (and in particular the queries) that are needed to support the front end components.
- Generating a new API spec for the back end from the concept specifications, which you will copy and place in the repo of your front end.
- Vibe coding some front-end components that use the back-end service.
- Testing the app by running the back end locally, and then starting up the front end locally too.
Visual design study. This assignment includes an exercise in visual design. The sketches you constructed in A2 and A3 focused on identifying the high-level user interface elements your app would use, how they would be laid out, and how users would flow between different screens of your app. In contrast, a visual design study will help you establish the ”look and feel” of your app—namely, what fonts and colors will you use, and what do they communicate about your app’s purpose. You’ll postpone this to the second half of the assignment, so that you can focus initially on getting your front end up and running before you turn to tweaking its visual appearance.
Tasks
Synchronize your back-end repo. The back-end template repository https://github.com/61040-fa25/concept_backend has been extended with some useful features. Assuming you forked it, you should be able to update your fork by selecting the sync option in GitHub in your browser. Alternatively, you can just copy the new files. The updates include: (a) some prompts for generating the API spec from concepts (design/tools/api-extraction-from-spec.md and design/tools/api-extraction-from-code.md); (b) a utility (src/concept-server.ts) that will automatically provide access to your concept actions and queries as HTTP requests; (c) an updated configuration file (deno.json) that defines a command you can execute in the terminal (deno task concepts) to run your back-end server; and (d) updates to the background files (in design/background).
Generate an API spec for your back end and start it up. Using the api-extraction prompt, generate an API spec or your back end. Start the back end running by executing deno task concepts in the console. Note the URL that it reports the server is listening on (eg, http://localhost:8000). The server will automatically create routes so that a request to /api/concept_c/action_a results in a call to action action_a of concept concept_c.
Initialize a front-end repo. Create a new repo in the GitHub browser UI, and clone a local copy. Open it in your agentic coding tool, and ask the tool to initialize the repo as a Vue.js application. Copy the API spec from your back-end repo (which you presumably have open in another IDE, such as Visual Studio Code) and place it in a file in the new repo. Tell your agentic coding tool where the back end is running (for example at http://localhost:8000/api) and point it to the API spec file.
Reactive Components. Implement your sketches and concepts as a series of individual Vue.js components. These components should cleanly separate concerns—each component should be responsible for managing its own state/data and other behavior. Note: there may not be an exact one-to-one correspondence between your concepts and Vue components as some components may combine data from multiple concepts, or vice versa. Components may be nested within one another, and will need to pass data back and forth accordingly (i.e., via props when passing data from a parent component to a child, or by emitting custom events to pass data vice-versa). You will likely also have some shared front-end state across components, using the browser’s native local storage or a Pinia store. The resultant user interface should be reactive: the web page should not need to be refreshed or reloaded to see the effect of the user’s action. For this task, we recommend focusing exclusively on the functionality of your components. Aesthetic concerns will come next.
Testing your app and updating. Make sure to test your front end repeatedly as you develop, ensuring that it works correctly with your back end. You are likely to find you will need to make changes both to the back end (for example, to add queries and actions) and to the front end. If you didn’t complete all your concept implementations, this is the time to do it! Document any significant changes to your back-end design.
User journey. Write a one-paragraph user journey of one possible way in which someone might use your app. You may re-use a user journey from past assignments if you’d like, or come up with a new one. One week in, your prototype must be, at a minimum, capable of demonstrating this user journey. It’s okay if the prototype is very rough around the edges and doesn’t contain your final style and layout. It is okay if your final app ultimately differs substantially from this prototype.
Screen recording. Make a screen recording (maximum two minutes long) where you use your app and demonstrate the user journey. Provide a narration describing the user journey as it takes place. You can use any tool you’d like to make the screen recording. For instance: QuickTime Player on Mac can simultaneously record a video of your screen and audio from your microphone. On Windows, the Snipping Tool https://support.microsoft.com/en-us/windows/use-snipping-tool-to-capture-screenshots-00246869-1843-655f-f220-97299b865f6b can record a video of your screen and lets you add audio after.
Visual design study. Look through a diverse range of visual media (including photographs, screenshots, magazines, newsprint, graphic novels, etc.) and assemble two slides of inspiration focusing on typography and color respectively. On each slide, collage together examples that you find particularly inspiring, and then use the margins to extract or annotate particular design choices you might be interested in exploring (e.g., specific color palettes and font families, or characteristics that you find interesting such as serifs, tall/short x-heights, etc.). Here is an example of a slide that focuses on color selection.
Styling and Layout. Once you have your component tree implemented, turn to the aesthetic aspects of your user interface design. Drawing on your design study, make choices for the layout of your components, as well as the colors and typography they use, to provide a usable, accessible, and pleasant experience for your users. Think about how you can use these different aspects of style to convey importance (e.g., using colors to indicate successes or errors) or an order of operations (e.g., left or right sidebars, or heading levels to suggest an outline).
Submission
For the checkin submission (Oct 21), you should include:
- Your user journey;
- Your screen recording. Note that you should not spend a lot of time preparing this; its purpose is just to allow the staff to assess how your work is progressing.
For the final submission (Oct 28), you should include:
- Your visual design study;
- An updated user journey;
- An updated screen recording;
- An updated design doc in the back-end repo summarizing any major changes.
Your user journey, screen recording and visual design study should all be placed in your front-end repo. Your updated design doc should remain in the back-end repo.
For both submissions you should submit a Google form with two commit hashes (one for the front-end repo and one for the back-end repo). Here are the forms: checkin submission form, final submission form. Fill in the survey form within 24 hours after the final assignment deadline.
Note: Slack days may only be used to extend the final deadline; you must turn your checkin in by its deadline.
Rubric
| Component | Description (what good work looks like) | Common Failures (examples of falling short) |
|---|---|---|
| Functionality | The frontend supports all functionality described by the operational principles and actions of the concept designs; the app is fully reactive and requires no page refreshes. | Some actions or parts are missing; the app only partially reflects operational principles; occasional or frequent page refreshes are required; reactivity is inconsistent. |
| Robustness | Where appropriate, client‑side validation and error checking are performed; informative error messages are shown. | Validation is present but misses opportunities to catch errors; several areas lack client‑side validation; error messages are missing, opaque, or unhelpful. |
| Usability | Visual and interaction design help users learn novel concepts, providing an efficient and intuitive flow through the app. | Usability frictions arise from visual or interaction design choices; minimal design makes the app difficult or frustrating to use. |
| Visual Design Study | The design study explores a diverse range of visual media; typographic and color inspiration are well‑extracted and communicated. | Inspiration is drawn from a narrow range of sources; the study is missing or incomplete (e.g., focuses only on color or only on typography); specific inspirations are not identified or are poorly communicated. |
| Styling & Layout | Layout and styling give the app an attractive, cohesive, and clearly draws on the visual design study. | Rough edges undermine cohesion or attractiveness; styling and layout are minimal and fail to provide a cohesive feel. |
| User journey | User journey and screen recording clearly illustrate a compelling use of the app. | Journey or recording are hard to follow or don’t seem demonstrate a useful task being fulfilled. |
Advice
Cursor pro plan for students. Cursor offers their Pro plan to students free for a year https://cursor.com/students. We’ve heard from a couple students who have had trouble getting Cursor to validate their student status. As an alternative, Github’s student pack https://education.github.com/pack includes free Copilot Pro, which provides a similar agentic coding tool to Cursor within Visual Studio Code.
Using Context for front end. The Context tool is not tied to concepts in any way; its purpose is to give you control over context selection and to keep immutable snapshots of LLM interactions. You can choose to use the Context tool for the front end too (instead of an agentic tool) if you wish, although we encourage you to try out an agentic tool so you have the experience of using one.
Axios. We recommend, in your prompt, asking the agent to use Axios for making calls to the back-end API.
State storage. You will probably need to store some state across all front-end components, for example to maintain a session token that is returned by an authentication concept. The easiest way to do this is to use the browser’s native local storage facility, and you should feel free to do it this way. This approach is not considered good practice though, because the state is not encrypted, so session tokens are vulnerable to being leaked (eg, through cross-site scripting attacks). For this reason, more standard practice is to use custom stores such as Pinia.
Using Postman to check your back-end service. Before you start coding your front end, it’s a good idea to just check that your back end is responding to HTTP requests as expected. You can execute it easily with a variety of tools. Probably the easiest to use is Postman, an app that lets you form a request in a simple UI and then view the response. The free version will suffice. Here is an example of using Postman to check that a login request behaves as expected:
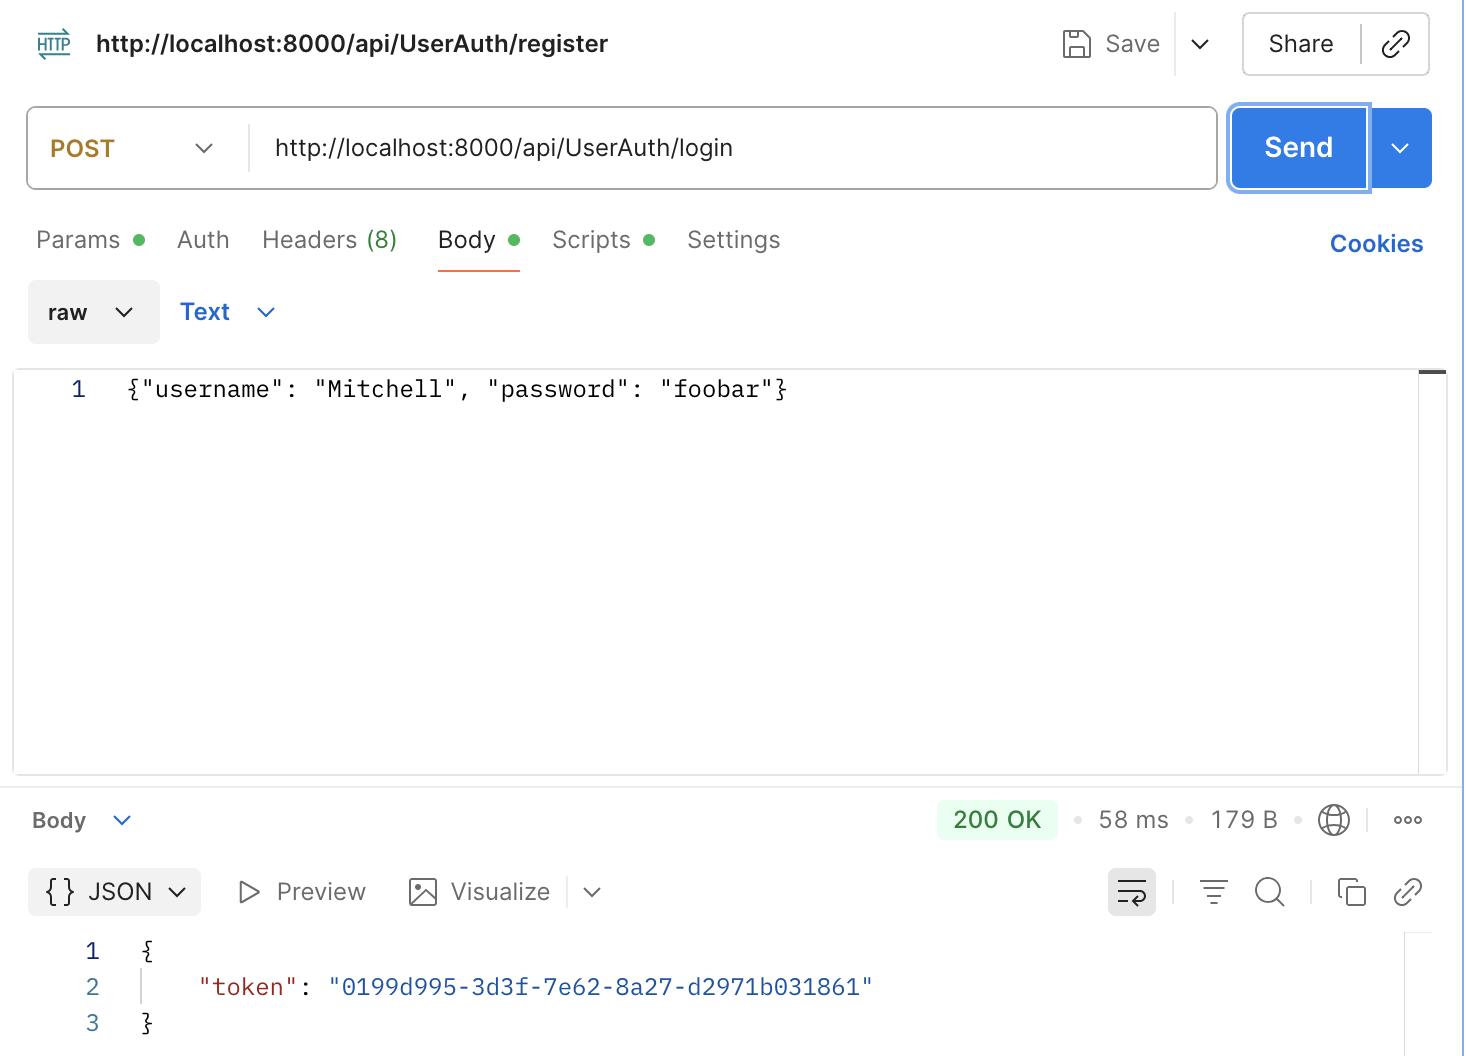
Note that the parameters to all requests will be presented as raw JSON, so make sure to select that option and to enter a JSON expression as we’ve done here.
Review 6.1020 (6.031) material. This assignment builds on ideas covered in 6.1020 (6.031) including callbacks and graphical user interfaces and asynchrony and Promises. We recommend working through the materials from 6.1020 (6.031) if these ideas are new to you, or you haven’t seen them in a while.
Color palettes. Finding colors that work together can be tricky business. We recommend using a color palette generator like Coolors or Adobe Color.
Typography. You are not restricted to the basic fonts available in the browser. Instead, feel free to browse the large libraries of free fonts available via Google and Adobe — follow the instructions for how to include such fonts in your Vue app. If you Google around, you’ll find lots of recommendations for which fonts are popular currently, and how you might mix fonts together (e.g., a serif font for body text, and a sans serif font for headings, etc).
Why Vue.js? We use Vue.js as the front-end framework in this class because (1) it incorporates the key notions of components and reactivity that are present in most frameworks; (2) it is widely used and well represented in LLM training sets; and (3) it is easier to learn than more complex frameworks (such as React).